In the previous tutorial, you you learnt how to remove the “index.php” from URL. Now, we are ready for the “Hello World!” complete with code.
GOALS!
In this tutorial, we will learn CodeIgniter 3 MVC by making a Hello World! program, complete with database, introduction to CRUD operations, form, switching pages and code. We will cover a LOT in this tutorial and I am sure you will get a lot of knowledge about CodeIgniter 3. Check the following list to see what you will learn.
- Create a database to be used by Model
- Connect the database to the web application
- Create a custom model:
- Model will use the Database
- model will contain a “Hello World!” in a function as a return value for controller to use.
- Create two custom views:
- We will Load views from controller.
- Pass data to the views using controller.
- Use data from controller in Views.
- Make a form which will work along with Controller.
- Call controller custom function.
- Pages association (move from page to page)
- Create a controller that will:
- Load the model.
- Use model function in controller.
- Receive input from model in controller.
- Interact with database using model.
- Pass data to views using data[] array.
- Create custom controller function.
- Load views.
- Load view from a button in another view.
- Use helper;
- Use constructor.
As you can see, this is a seriously deep “Hello World!” tutorial. I am sure that you will learn a lot in the end. You will be prepared to learn more without having to worry about learning the basics. Lets get started!
BEGIN!
Creating the Database
1. Create a Database
We will create a database to be used for this tutorial.
- In XAMPP, go to localhost/phpmyadmin/
- Create a database called “citutorial“
- Create a table using this SQL query
CREATE TABLE `citutorial`.`helloworldtable` ( `id` INT NOT NULL AUTO_INCREMENT , `message` VARCHAR(255) NOT NULL , PRIMARY KEY (`id`) ) ENGINE = InnoDB;
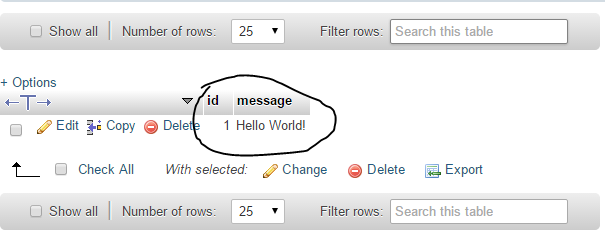
- Now make a simple “Hello World!” entry in the table so that the table has just a single entry of
id = 1
message = Hello World!
Eventually, your table should look like this,

2. Connect the Database
Go to the /application/config/database.php and modify the settings for the database citutorial. You need to input the database username, password and database name. By default, the username in XAMPP is “root” and password is empty i.e. “”. And the database name is “citutorial“. So the settings are,
$active_group = 'default';
$query_builder = TRUE;

$db['default'] = array(
	'dsn'	=> '',
	'hostname' => 'localhost',
	'username' => 'root',
	'password' => '',
	'database' => 'citutorial',
	'dbdriver' => 'mysqli',
	'dbprefix' => '',
	'pconnect' => FALSE,
	'db_debug' => (ENVIRONMENT !== 'production'),
	'cache_on' => FALSE,
	'cachedir' => '',
	'char_set' => 'utf8',
	'dbcollat' => 'utf8_general_ci',
	'swap_pre' => '',
	'encrypt' => FALSE,
	'compress' => FALSE,
	'stricton' => FALSE,
	'failover' => array(),
	'save_queries' => TRUE
);
Creating the Model
Understanding the Model
We will now understand the model which will retrieve the “Hello World!” message from the database table we created in steps 1 & 2. First, I will show you what method I used and then you will get the entire model code.
For this tutorial, I have first selected the “table” in our database using this line of code.
// $this->db->from("NAME_OF_TABLE");
$query = $this->db->from("helloworldtable");
Then, I provided the criteria to find the “Hello World!” message from the table like this. Note that in the following line of code, “message” is the column name and “Hello World!” is the specific search keyword that is to be matched in order to retrieve the value.
//$this->db->where('TABLE_COLUMN_NAME', "SEARCH_KEYWORD");
$query = $this->db->where('message', "Hello World!");
Then, I checked if the query was successful and performed an action on the basis of the success or failure of the query like so.
if(!$query){
	echo "Failed to find the \"Hello World\" Entry<br>";
}else{
	echo "Successfully found the \"Hello World\" Entry<br>";
	return $this->db->get()->result();
}
Note that in the end, I simply returned the result of the query like this.
return $this->db->get()->result();
(Alternative approach)
Now, note that all of this could also have been done using the following model function (which I won’t use).
function return_helloworld_message(){
	$this->db->from("helloworldtable");
	$this->db->where('message', "Hello World!");
	return $this->db->get()->result();
}
3. Creating the model
Lets finally create the model file and add the code.
- Go to \application\models\1_hello_world\ and create a file called “Helloworld_model.php”.
- Double check that the file name starts with a capital letter since it is important in CI3.0+ versions.
- Now, open the file and add the following code to it.
<?php
defined('BASEPATH') OR exit('No direct script access allowed');

class Helloworld_model extends CI_Model {

	public function __construct()
    {
            // Call the CI_Model constructor
            parent::__construct();
    }

    function return_helloworld_message(){
    	// From the given table,
    	$query = $this->db->from("helloworldtable");

    	// Find where the column "message" has a value called "Hello World!"
    	$query = $this->db->where('message', "Hello World!");

    	// Check if the query was successful
    	if(!$query){
    		echo "Failed to find the \"Hello World\" Entry
";
    	}else{
    		echo "Successfully found the \"Hello World\" Entry
";
    		return $this->db->get()->result();
    	}
    	// Then, return the value from Model to the calling controller
    }
}
This completes the model to be used in this tutorial. Next, we will prepare our views to receive the input.
Creating the Views
For this tutorial, we will make two views.
- First view will be used to request a “Hello World!” query.
- Second view will be used to show the output (either failure or success)
4.1 Creating a view to request for a “Hello World!” message
This view will show a page which will ask the user to press a button to perform a request. Here are some points to note:
Follow these steps to make the request view..
- Go to \application\views\1_hello_world\ and create a file called “request_a_helloworld_message.php”.
- Add the following code to it.
<?php
defined('BASEPATH') OR exit('No direct script access allowed');
?>
<?php

     echo $buttonText;
     echo $pageTitle;
     echo $heading;
?>
<form action="<?php echo base_url();?>1_hello_world/helloworld/requestModel" method="post">
<?php echo $button_info; ?>
<input type="submit" value="<?php echo $buttonText; ?>" />
</form>
4.2 Creating a view to show result
Upon completion of the request, an output message will be generated. This could contain either the “Hello World!” or an error message informing us about the failure to find the “Hello World!” message in database table.
-
- Go to \application\views\1_hello_world\ and create a file called “resultDisplay.php”.
- Add the following code to it
<?php defined('BASEPATH') OR exit('No direct script access allowed'); ?> <?php echo pageTitle; foreach ($modelData as $row) { echo $row--->message; } ?> <form action="<?php echo base_url();?>1_hello_world/helloworld/" method="post"> <input type="submit" value="<?php echo $buttonText; ?>" /> <table> <tr> <td><?php echo $button_info; ?></td> </tr> </table> </form>
Creating the Controller
Now comes the really interesting component of CodeIgniter. The Controller! The controller will allow us to perform the following functions of the Hello World! tutorial application.
-
- Load the database to be used by the Model.
- Allow switching between two views with a button.
- Send data from controller and model to the view.
- Loading views.
- Calling model functions and passing its result into the view.
Now, lets first understand how I used the controller in this tutorial.
Understanding the Controller
In my controller. I have two functions which are,
-
- index() function which by default loads a request view.
- requestModel() function which is called by clicking a button in the “request_a_helloworld_message.php” view.
index()
In this function, I am simply loading a view and passing data to it. The data is passed as an array like this,
$data['pageTitle'] = "Codeonion Tutorials!";
$data['heading'] = "Welcome to Hello World! Request page!";
$data['button_info'] = "Press the button to see the message from model.";
$data['buttonText'] = "Submit a Request to model";
The reason I have done it is to show you how it is possible to control the data you wish to show in view from the controller, instead of actually typing it into the view as simple HTML.
When loading views, it is possible to pass data to it. You can even load entire views into variables and pass them into the view.
$this->load->view('1_hello_world/request_a_helloworld_message', $data);
requestModel()
In this function, I am calling a model function and basically passing its result into the view.
I am calling a model and giving it a name of “helloworldmodel” like this,
$this->load->model('1_hello_world/Helloworld_model', 'helloworldmodel');Afterwards, I have called a model function called “return_helloworld_message()” and stored its output in “$data[‘modelData’]” like this,
$data['modelData'] = $this->helloworldmodel->return_helloworld_message();Finally, as before, I have loaded a view to show results and passed data to it like this.
$this->load->view('1_hello_world/resultDisplay', $data);
5. Creating the controller
Now, we will finally create a controller and put the code in it.
- Go to \application\controllers\1_hello_world\ and create a “Helloworld.php” and make sure that the file name starts with a capital letter
- Copy the following code into the Helloworld.php controller.
<?php
defined('BASEPATH') OR exit('No direct script access allowed');

class Helloworld extends CI_Controller {
	public function __construct()
        {
            parent::__construct();
            // Helpers and libraries called in constructor will be available
            // in every function of this Helloworld controller class
            $this->load->database();
            $this->load->helper("URL");
        }

	public function index(){

		// General strings stored in $data array
		// These are to be displayed in the "request_a_helloworld_message" view
		$data['pageTitle'] = "Codeonion Tutorials!";
		$data['heading'] = "Welcome to Hello World! Request page!";
		$data['button_info'] = "Press the button to see the message from model.";
		$data['buttonText'] = "Submit a Request to model";

		// And we pass the data into the view.
		$this->load->view('1_hello_world/request_a_helloworld_message', $data);
	}

	public function requestModel(){

		// General Variables just like in index() function of this controller
		$data['pageTitle'] = "Codeonion Tutorials!";
		$data['heading'] = "This is the result!";
		$data['button_info'] = "Press the button to see the Hello World! message.";
		$data['buttonText'] = "Back";

		// We load the model
		$this->load->model('1_hello_world/Helloworld_model', 'helloworldmodel');

		// We store the result of modal function in $data array
		$data['modelData'] = $this->helloworldmodel->return_helloworld_message();

		// We pass $data array into the "resultDisplay" view
		$this->load->view('1_hello_world/resultDisplay', $data);

	}
}
Now, you are ready to test the application.
Testing the Hello World! application
- Go to your browser (chrome in my case) and go to the following address (or the correct address according to your own setup)
http://localhost/tutorial/1_hello_world/helloworld - You will see the following on the browser

- Press the “Submit a Request to model” button and you will go to the following link
http://localhost/tutorial/1_hello_world/helloworld/requestModel - At this point, you will be seeing this output,

- At this point, you can press back to start over.
You can now see that your application can retrieve data from database. This is it! the tutorial is complete!
Conclusion
You have learnt how to create a complete MVC application using CodeIgniter complete with the database. You now have the knowledge required to learn and develop more advanced web applications.
If you found my post helpful or have any questions, please leave a comment. [button link=”https://www.facebook.com/ubaaconsultants” type=”small” newwindow=”yes”] Facebook[/button] [button link=”https://twitter.com/Codeonion” type=”small” newwindow=”yes”] Twitter[/button]
If you think that there is something missing, or you would like me to add something or even, if you wish to request a tutorial, just let me know and I will make a tutorial just for you.
6 responses to “CodeIgniter 3 – Create your own Hello World with simple form and database!”
The requested URL /CodeIgniter-3.1.6/helloworld/requestModel was not found on this server.
1. We have to load database libraries, to have to update autoload.php file and modify libraries value.
2. If we get further errors, try to fix by following these links.
http://stackoverflow.com/questions/14297770/cannot-remove-index-php-from-codeigniter-url
https://webdevdoor.com/php/mod_rewrite-windows-apache-url-rewriting
We can automatically create the codeigniter and other framework crud functionality using http://crudgenerator.in
Go to \application\models\1_hello_world\ and create a file called “Helloworld_model.php”.
do we have to create a new folder called 1_hello_world, because it dose not exist
For this tutorial, you have to create that folder. I have done so to make it easier for new learners to understand working with folder structure of CodeIgniter. It is not necessary to make folders every time.
Note that in the Controller, I have called the model like this:
$this->load->model(‘1_hello_world/Helloworld_model’, ‘helloworldmodel’);
You can make folders to give structure to your project. If you do not wish to do that, or are comfortable with a flat structure of folders, then you can just ignore makign the folders 🙂
I was very interested in your tutorial, but the two view files were undecipherable. Did something get lost?